Are you a WordPress newbie? Or have you maybe built your own blog but haven’t dabbled much in the Settings panel of the WordPress backend? Whatever the case may be, proper configuration of some of the WordPress settings of your blog can make or break the success of a site.
For these reasons and many others, we at BloggerTips have curated some great tips to take charge of your Settings.
Utilizing a working email address instead of a throwaway
We would highly recommend going with something besides your personal email address here. Additionally, one trap that many bloggers fall into is popping an email in here that is not checked often. Ensuring that you utilize a relevant email that is either checked often or forwarded to a watched address is vital.

There are two extremes here: Too informal and too unavailable.
Sometimes, people use their personal email address, which is typically a name-related address on a free email service like Gmail, Yahoo, etc. While this may be ideal for quickly responding to inquiries, if you are aiming for growth, this can bog down quickly.
Changing your website’s tagline if you haven’t done so
You would be very surprised at how many people fail to change the tagline of their WordPress blog. The site title needs to be accurate starting at the installation process. However, if something happens and you forget to set the tagline before installing, don’t be one of the many who completely overlook this.
Google “Just another WordPress site” in quotes. Do you see all the results that come up? Over 800 MILLION. This is the crowd you do not want to join. Think of a great tagline that succinctly explains in a few words what your site is. And no need to worry, these can be changed later with just a few button presses if you are unhappy with the result.
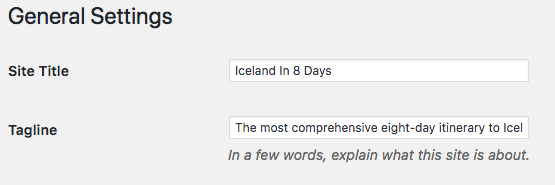
To edit your blog’s tagline in WordPress settings, go to General Settings from the dashboard by hovering over Settings in your WP-Admin panel and then clicking General. Once there, you will quickly see multiple things that can be edited and saved. One of those things is the tagline. Change and go.
Setting up the capability to post from anywhere online
How often do you come across something online that you think you could write a quick, relevant post about? You’re surfing Reddit, and all of a sudden you happen upon a topic that not only relates to your niche, but is also something that you are confident in your knowledge of.

There exists a bookmarklet called “Press This” in WordPress. It has been around for a while, and the functionality makes it simple to quickly and efficiently write and publish without needing to be in your website’s WordPress backend.
Here is how to enable Press This:
- Go to Dashboard, Tools, Available Tools.
- Find the Press This bookmarklet and drag it to your browser’s bookmarks toolbar.
That’s all! Now, when you discover something that you are interested in posting about when browsing, you can click the Press This button in your toolbar, and write a publish your post straight from the window that appears.
Selecting your time zone appropriately
Make sure you select the right time zone. This ensures that any posts you schedule out to automatically go live are published at the intended time. We have run into this issue in the past. Clients request posts to be pushed live at 6:00 in the morning, and they are scheduled as such. However, when the post goes live four hours earlier than anticipated, the client wants to know where things went wrong. This issue was their time zone settings for their WordPress site.
To change this, in WordPress settings, go to General Settings from the dashboard by hovering over Settings in your WP-Admin panel and then clicking General. Once there, you will quickly see multiple things that can be edited and saved.


The time zone automatically is set at UTC +0, but as stated, “Choose either a city in the same timezone as you or a UTC timezone offset.” We suggest selecting a city, as the UTC can become confusing.
Creating pages to display posts inside the site vs the home page
Are you looking to add a blog to your current WordPress website, but are not looking for your homepage to display your latest posts? If so, there is a quick workaround in the WordPress settings that can get the job done.
First, create a page through Dashboard, Pages, Add New. Call it Blog, or Posts, or whatever you’d like. Before publishing, in the Page Attributes box found on the right column of most WordPress versions, select Blog from the dropdown next to Template. Leave the text window of the page completely blank, and hit Publish.
Once published, navigate to Dashboard, Settings, Reading. Select the Blog page from the dropdown menu that shows under Front Page Displays, A Static Page, Posts Page. Save your changes, and go to [yoursite]/blog. It should show your latest posts here instead of on the home page!
Removing blog posts from your website’s front page
Many WordPress themes that do not have demo data imported will show blog posts on the home page. This is fine if your plan is to run a blog from the get-go. However, if you’re looking to start a brand and want your website to show a static page instead of posts, there is a quick and easy way to do so.
First, make a page that you are wanting to consider your new home page through Dashboard, Pages, Add New. Call it Home (or whatever you’d like), and then publish.
Once you do this, navigate to Dashboard, Settings, Reading. Select the home page from the dropdown menu that shows under Front Page Displays, A Static Page, Front Page. Save your changes, and refresh your home page. It should show that new page instead of your latest blog posts!
Change how many posts are displayed on the main blog
This is a big one. Limiting the number of posts that will show up on either a blog page or a home page if often a wonderful idea. Limiting this can cause your site to load far faster. This is especially true for sites where the posts are image heavy, or where the featured images have not been properly compressed with a plugin such as Smush Pro.
Additionally, less posts makes it far easier for blog readers to read on mobile, as it cuts down significantly on scrolling for whatever page the blog posts appear. This goes double if there are very important website elements that appear below posts, like product links or advertising.
To change the number of posts that display on site by default (before moving on to a new page), go to Dashboard, Settings, Reading. Where it says “Blog pages show at most X posts”, put the number of posts you would like to show per page in the box. Save changes, and refresh to see what happens!
Additional WordPress Settings Pro-Tips
Default settings for new users
In Settings, General, scroll until you hit the Membership and New Default Role section. Turn registration requirements on and off for users, and then set the role for new users from five options: Administrator, Editor, Author, Contributor, and Subscriber. We highly recommend Subscriber.

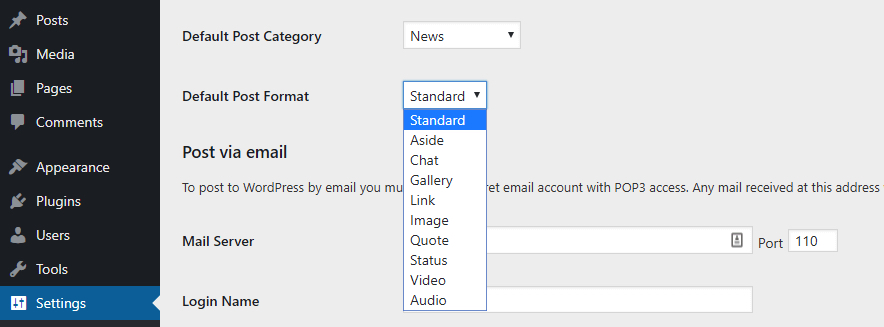
Specifications of post defaults
In Settings, Writing, check out the Default Post Category and Default Post Format. Default Post Category lets you configure a category that new posts fall into by default. With new WordPress installations, it will push to Uncategorized. New categories can be added in Posts, Categories.
Default Post Format lets you choose how your specific posts will look right off the bat. If you are mainly creating news or blog posts, however, we recommend you stick with the Standard option. Plus, you can set different formats for individual posts while editing them, so you’re not stuck using a single option.
Configuration of comment settings
Comments on blogs are by far one of the strongest methods for engaging with website visitors. Once user registration is enabled, users can comment. But, there are related settings to check out before publishing content.
To check out WordPress commenting options, go to Settings, Discussion. Here, Default article settings are found. Blog comments can be disabled altogether, or modified completely to customize how people can comment on your blog.

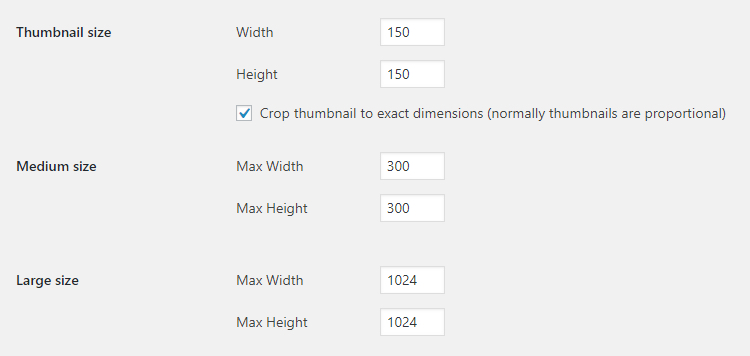
Default image size definitions
High quality images should always be used on your website. Nobody wants to see pixelated, blurry imagery on what is supposed to be an authoritative website. Higher quality images provide higher engagement, period.
However, there is another side to this coin. The clearer the images appear, the higher the size of the file. This means the site will load slower, which will turn people off from your site, increase bounce rate, and lower viewership overall.
Go to Settings, Media, and you’ll see three sets of sizes you can tinker with. The dimensions here are set in pixels, so keep that in mind if you want to make any changes to the defaults.
Wrapping Things Up
Proper configuration of some of the most basic WordPress settings can go a long way in the usability and readability of your blog. The tips above scratch the surface of what tweaking settings in WordPress can do for your site.