
Providing an excellent user experience is a critical component in growing and maintaining your blog’s audience. It is perhaps just as important as providing engaging, relevant content. Do readers come to your site and encounter poorly-organized navigation and slow page loading times? If so, they’re likely to click away from your blog and never return. You need a way to speed up your WordPress site.
Even if you’re not a tech genius, improving your site’s speed and search engine performance is easier than you might think. This is thanks to plugins like WP Super Cache. But before we get into the nuts and bolts of incorporating this “secret weapon” into your site’s arsenal, let’s take a look at what caching is and what it can do for you.
Caching Defined
Caching describes the process of creating static versions of the content on your site and delivering it to users. In WordPress, rendering a page or post requires sending new queries to and from the database. However, if a specific page isn’t being updated regularly, caching allows for static copies of that page to be provided to users without the back-and-forth with the database. This reduces the load on the server and boosts your site’s speed and performance.
Benefits of Caching to Speed Up Your WordPress Site
The most obvious benefit of caching is the positive effect it has on your site’s loading speed. Static cached files load faster than dynamic database queries. Therefore, visitors experience minimal lags when clicking to various pages on your site.
Additionally, caching reduces the load on your hosting server and conserves memory. This can be particularly valuable for bloggers with modest hosting plans.
Your site’s speed also affects your search engine ranking. So, improving your load time can also help boost your page rank and make it easier for users to find your site.
Get Caching with WP Super Cache in Seven Easy Steps
One of the biggest draws of WordPress is its ease of use. Its user-friendly design and intuitive settings make it accessible to almost anyone without requiring a degree in information technology. So if the idea of optimizing your site through caching sounds intimidating, don’t panic. The WP Super Cache plugin takes care of everything for you. All you have to do is install it and let it work its magic.
Step 1: Download and Install
As an official WordPress plugin, WP Super Cache can be downloaded and installed right from your WordPress dashboard. Go to Plugins and select “Add New,” then search for “WP Super Cache”. Then, click “Install Now.” Within a few moments, an “Activate” button should replace “Install Now.” Click the button to complete activation.
Step 2: Turn on Caching
No matter your level of technical expertise, WP Super Cache is incredibly easy to use. Unlocking its power simply requires a few clicks of the mouse. The first setting you’ll need to update is basic caching. To do this, go to your WordPress Dashboard and select WP Super Cache under the Settings tab. Check the button for “Caching On” and then click “Update Status.”
Turning on the cache will create a “Test Cache” button. Click on it to make sure the plugin works properly. The test will load your site two times and check to see if their timestamps match. If they do, your basic cache function is working as it should.
This step alone should result in a 50 percent or greater improvement in your page load times.
Step 3: Update Advanced Settings
In addition to basic caching, WP Super Cache’s advanced options provide opportunities to further reduce your page load time and prevent any caching-related hiccups. Go to the Advanced tab under WP Super Cache Settings and we’ll walk step-by-step through the plugin’s advanced settings. This will help you achieve ultimate optimization of your site.
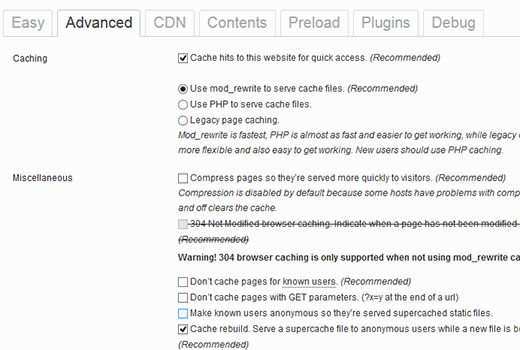
The first section under the Advanced Settings is labeled “Caching.” Under the button that verifies that caching is activated, you’ll be able to select one of three caching options: Mod_Rewrite, PHP and Legacy. The default setting is PHP, but Mod_Rewrite is the preferred choice for sites hosted on a shared server.
If this applies to you, click on Mod_Rewrite and then “Update Status.” The next screen will instruct you to update the rewrite rules. Do so by clicking the “Update Mod_Rewrite Rules” button under the section with the same title.
Under Miscellaneous settings, you’ll want to enable the following options:
Don’t cache pages for known users
This setting ensures that WordPress will continue to dynamically generate pages for users who are logged into your site (which typically means you and any other site administrators you may have designated). Checking this box ensures that you will always see changes to the site in real time, instead of the roughly 30-minute lag that anonymous users may experience before any changes to the site go live.
Compress pages so they’re served more quickly to visitors
Checking this setting tells WP Super Cache to compress the size of the static files it generates while preserving the function of that file. Smaller file sizes will allow your page to load slightly faster, giving you a small bump in performance. Be sure to check your site’s functionality afterward. A small number of users have experienced issues after enabling this setting. If you discover problems, simply uncheck this setting. The effect it may have on your site speed should be barely perceptible.
304 Not Modified browser caching
Selecting this setting activates browser caching. This directs returning users’ browsers not to reload portions of your site that have remained the same since their previous visit. The browser instead loads the file temporarily stored on their computer from their last visit, which takes less time than downloading it from your host server.
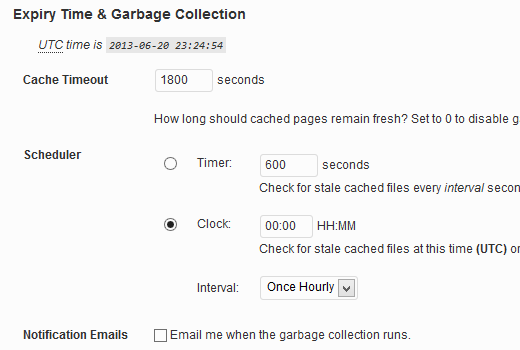
Expiry time and garbage collection
This section enables you to set a schedule for automatically clearing old caches files from your site. In addition to the cache timeout schedule, you can also decide when to check for old cached files and determine how often you want this check to be performed.
Step 4: Exclude Problem Pages from Caching
In most cases, caching won’t create any problems with your content. However, certain types of pages, such as forms where visitors enter information for submission, can occasionally experience issues as a result of a caching plugin. To avoid passing on these problems to your users, be sure to periodically test key pages on your site as an anonymous user. This will let you get a clear view of what visitors experience.
To do this, open a new browser window in Incognito (Chrome) or Private Browsing (Firefox, Internet Explorer) mode. Then, visit any pages on your site that include advanced functionality, such as forms or chat windows. If you encounter any issues with the page loading or operating properly, you can manually exclude that page from caching:
- Under Advanced Settings, go to “Accepted Filenames and Rejected URLs.”
- In the window with the caption “Add here strings (not a filename) that forces a page not to be cached,” copy and paste the URL slug (the segment of the URL after the slash) for the page that’s causing problems.
Step 5: Use a CDN for Added Speed
Visitors’ physical proximity to your host server can impact your site’s loading speed, so if a user is thousands of miles from the server, they may experience sluggish load times. Using a Content Delivery Network, or CDN, can help bridge this geographic gap.
Think of a CDN as something akin to a warehouse in a supply chain. For example, while Amazon’s corporate headquarters is located in Seattle, the company has distribution centers scattered around the United States to help get its goods to customers more quickly. Similarly, a CDN uses servers in various global locations to store copies of static files from your website. This allows visitors’ computers to access files from the server closest to them, which can be significantly faster than requiring them to download the files from your primary host server.
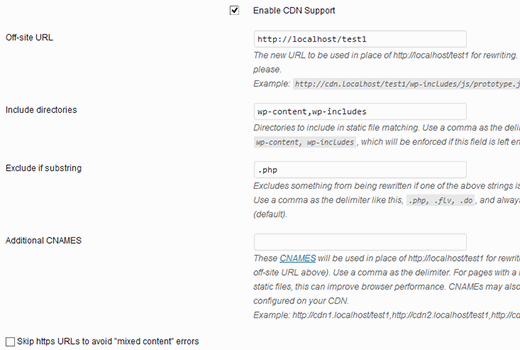
Conveniently, WP Super Cache comes with a built-in CDN. Select the CDN tab and check the Enable CDN Support Option. In the Off-Site URL box, you’ll need to input a “pull zone” address where your static content will be stored. Choose which folders should be used in file matching and add them to the “Include Directories” field, while files you’d like to exclude should be entered in the “Exclude If Substring” field. Once you’ve entered all necessary information, click “Save Changes” and then clear your cache. Your site’s images, JavaScript and CSS files should now be loaded from the CDN instead of your host server.
Step 6: Preload Content
This WP Super Cache feature creates “supercache static files” of your pages. This can dramatically enhance the speed of your site. However, this feature also entails the creation of large numbers of new files, which may not be ideal for limited or shared hosting plans.
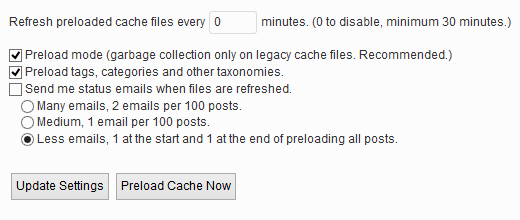
If you fall into this category, you may want to cache only your newest content. To activate this feature, check the boxes for “Preload mode (garbage collection only on legacy cache files” and “Preload tags, categories and other taxonomies.” If you’d like to know when files are refreshed, click the box allowing status emails and select how frequently you want to receive notifications. Finally, click “Update Settings” to save your changes.
Step 7: Manually Clear Your Cache When Necessary
While caching can make your site load lightning-fast, it can also prevent visitors from immediately seeing any changes to your content. If you want an update or new post to go live to your readers instantly, you’ll need to manually clear your cache. To do this, go to the Settings section of your WordPress dashboard and choose WP Super Cache. Under the Contents tab, click on “Delete Cache” and your content will be refreshed for users to see right away.
WP Super Cache Technical Support
Like many free WordPress plugins, technical support for WP Super Cache is almost entirely dependent on user-generated forums and FAQ threads. Fortunately, the plugin’s popularity means that there are plenty of online resources to help you troubleshoot issues. You can also discover new tips and tricks for getting the most out of this add-on.
WP Super Cache – Final Thoughts
While WP Super Cache isn’t the only open-source caching plugin available to WordPress users—W3 Total Cache is another popular option that offers comparable features—it has the advantage of being easy to install and use as well as highly effective in improving site speed and performance. Take just a few minutes to download, install and configure this powerful tool. Then, you’ll ensure a seamless user experience for both current and future visitors to your site.