With so much of our professional and personal lives moving online, blogs have become an important source of information and entertainment in the digital realm. Not only do they offer a way to stay up-to-date on the latest news or a specific area of interest, but they also provide a forum for interaction with both the blog’s author and other readers. Learning how to start a blog is easier than you think, and this article will provide all the details you’ll need to add your voice to the online conversation.
Getting Started: The What and Why of Blogging
Your first step is determining what the subject of your blog will be. It could be a broad topic, like politics, fitness or parenting, or something very specific, like raising hedgehogs or creating gluten-free recipes. Blogs may be geared toward instruction (like do-it-yourself home improvement projects), sharing your experience (for example, a travel or workout blog), entertainment (posting short stories or comic writing) or a call to action (frequently used for business-related blogs). Whatever you choose, make sure it’s something you’re passionate about, or you may run out of inspiration after a few months.
You should also consider your goals for starting a blog. Are you blogging to build an online community of people with similar interests? Is a blog your first step toward becoming a published author? Do you aspire to make money from your blog? These factors will play an important role in your approach to blogging.
Once you’ve decided on your subject and goals, do your research. Look at other blogs in your chosen category and review their style and tone. How frequently do they post new content? How does the author engage readers in the comments section? Do they include ads or sponsored posts? What about their design and writing appeals to you, and what might you do differently? You don’t want to create a carbon copy of other successful blogs, but you can use them as guidelines to help shape your overall strategy.
Next, you’ll want to come up with a name for your blog. It may reflect something about you as the author, the subject of the blog, or a combination of both. It can be clever or straightforward; just make sure it’s both unique and memorable, so it’s easy for readers to find it and keep coming back.
How to Start a Blog Step One: Starting on Bluehost
The first step is to select a high-quality web hosting provider. We highly recommend to all our bloggers, regardless of aptitude and experience, to take advantage of the incredible ease of use and low price of Bluehost.
One of the main reasons we suggest Bluehost is its effective, quick, and painless WordPress installation. Users who sign up for a Bluehost web hosting account receive a bundled-together one-click installation for WordPress, our recommended CMS (content management system). A content management system is a fancy way to say a “blogging platform”.
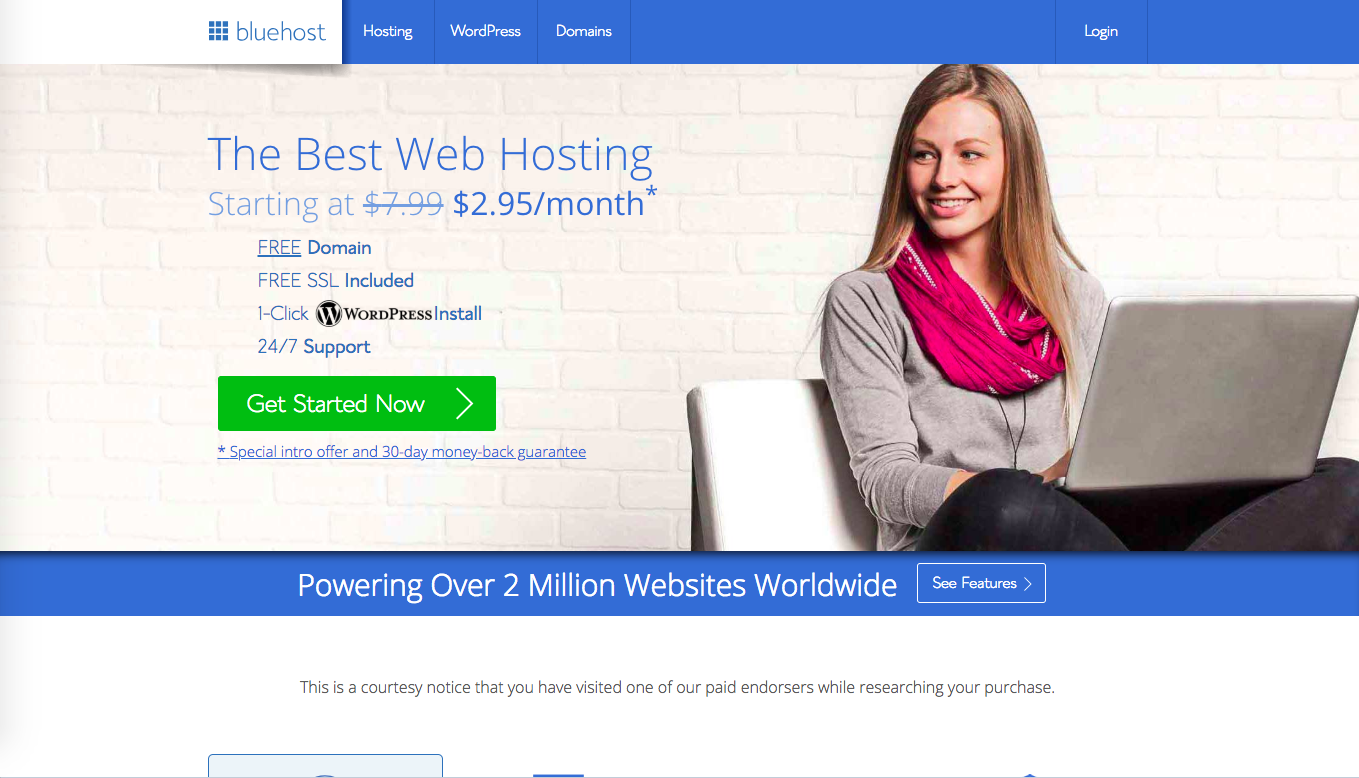
Ready to get started? The first step is to go to Bluehost.com and click the big blue Get Started Now button right in the center of the screen.
Step Two: Selecting Your Bluehost Hosting Plan
The next step is to select your Bluehost hosting plan from the available options listed above. If you are a blogger who is just getting started or are looking for just one site, the Basic plan will meet your needs. If your budget allows, we highly suggest the Pro plan, though. The Bluehost Pro plan comes with the following:
- Free domain privacy: This hides your domain name registration information from the public eye. This not only protects against malicious intent but can also greatly minimize the amount of spam you receive after registering a new domain.
- Professional site backup: This feature backs up web hosting files, databases, folders, and emails. This allows you to utilize them if something goes awry with production files. Think of this as a solid backup plan.
Prices often change for introductory rates as well:
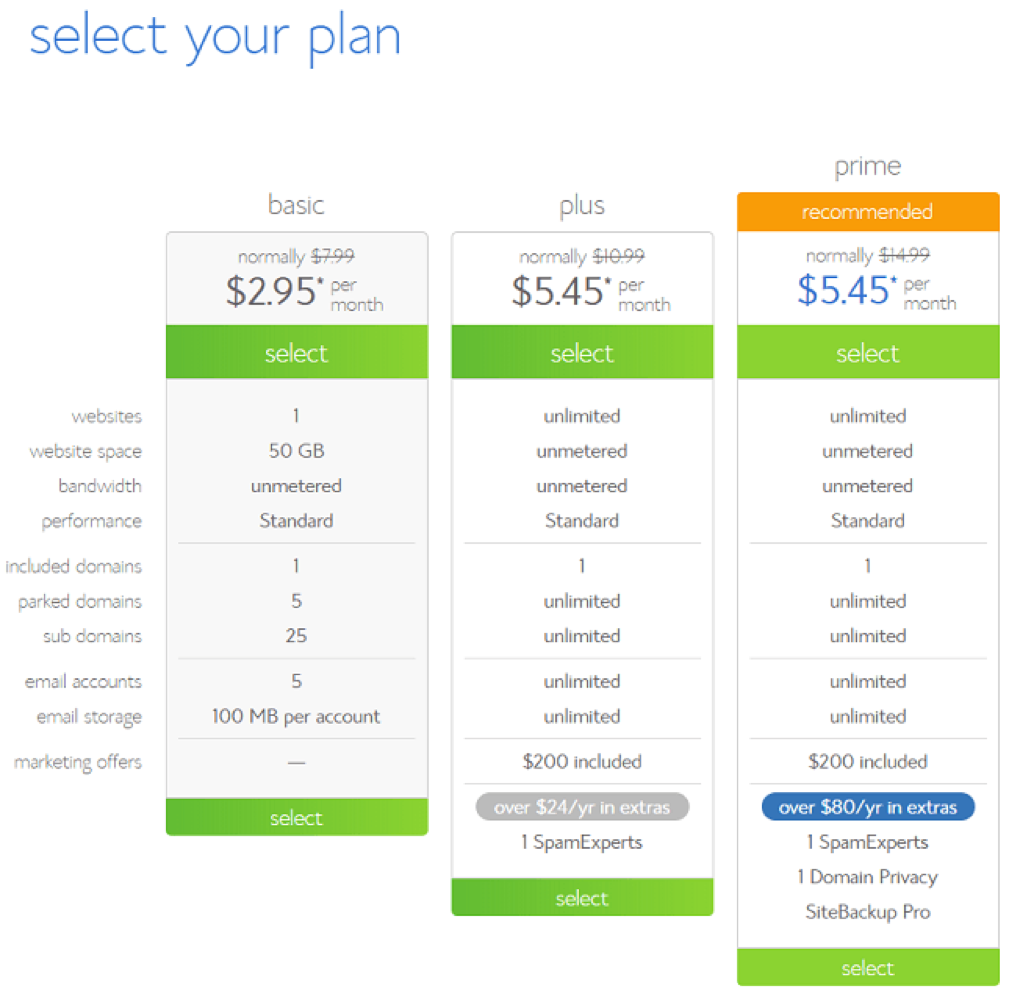
They also have additional plan add-ons such as security certificates (the https you see on many high-profile websites). However, if you are looking for a simple WordPress installation with Bluehost, then the Basic plan is right up your alley.
As your website experiences growth, you can make the decision on when to upgrade your plan. Luckily, upgrading to the next tier with Bluehost is a breeze as well!
Note: “Why Can’t I Just Use A Free Option?”
There are a few free blogging platforms available out there that you just need to hitch your domain name to. However, in our experience, we highly recommend not using them, and instead going with a paid, high-quality hosting platform. Why?
Blogger is a blogging service provided by Google. It is free, reliable much of the time, and works fine for publishing your content online. However, you don’t own it. Google runs this service and has the right to shut it down, or shut down your access to it at any time. Think Google+.
The same goes for any other free option over a hosting service. There has to be something in it for the service provider.
Step Three: Selecting a Domain Name
Once you have made a selection on a hosting plan through Bluehost, the next step is choosing a domain name to represent your blog and brand. This is done on the next page, which looks very much like this:
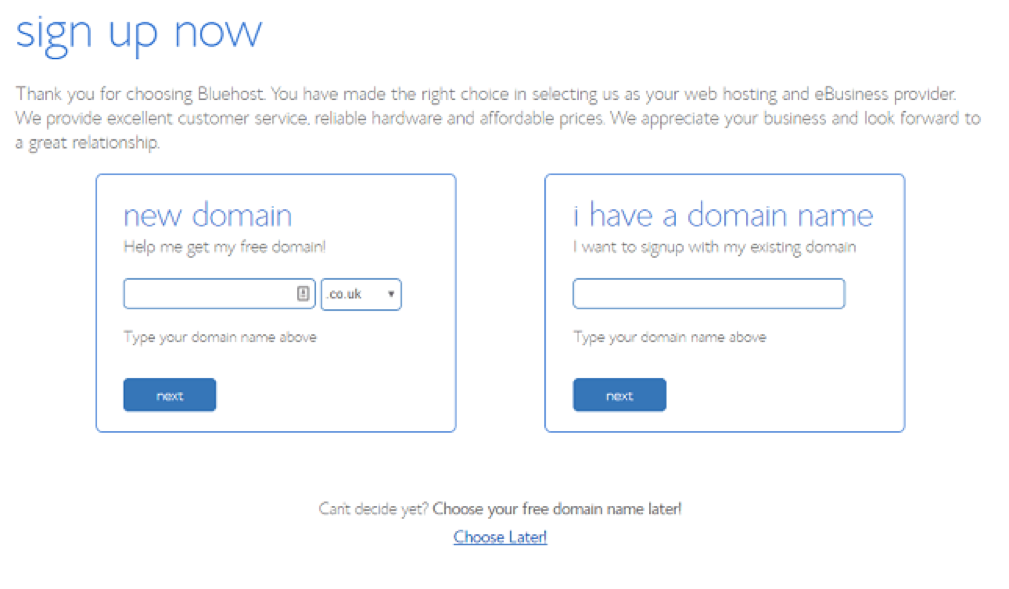
Next to the box for the name is a drop-down menu where you can choose your TLD. A TLD is called a top-level domain, and is the .[LETTERS] appended to the end of a URL. So .com, .net, .org, etc are all TLDs. We suggest .COM as a default, but using .net or .org doesn’t hurt at all.
Additionally, there may be a TLD that better fits your brand or your target geographic location. It’s important to determine what provides the most relevance to your own blog, and who you are expecting your blog visitors to be.
But I already have my domain name! This isn’t a problem. See the box on the right. You can enter it and follow Bluehost’s simple prompts to get your current domain ported over to their hosting platform, or migrated completely, quick as a flash.
Step Four: Creating A Bluehost Account
The next step of the process for getting your blog set up is to create your account on Bluehost’s platform. To do this, you should first fill out the complete details requested from Bluehost on the account creation form:
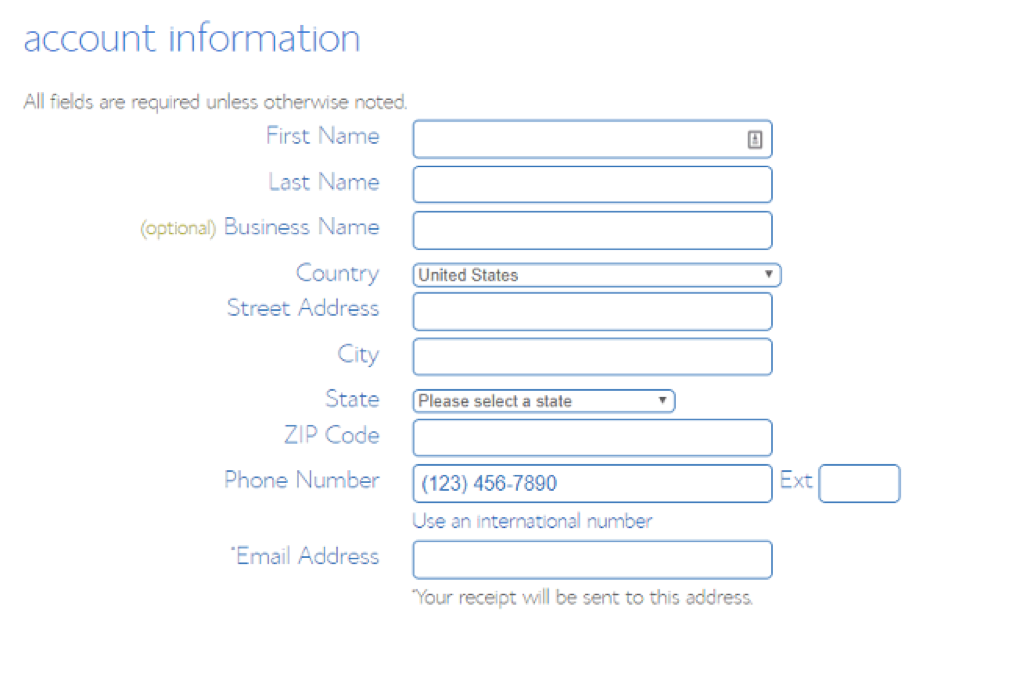
Once this is done, double-check the information for the selected package and the add-ons you may have chosen for your site.
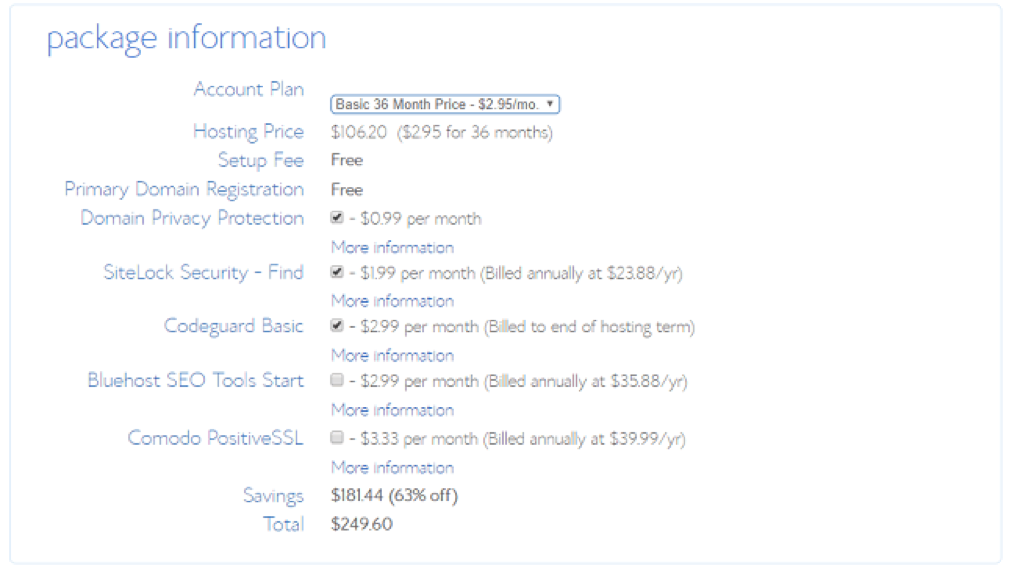
Keep an eye out for any add-ons that may come pre-selected. If you are not looking for these extras, they are optional. Just make sure you uncheck the boxes!
Added features recommended by Bluehost are of high caliber, though. Maintaining strong SEO (search engine optimization) while building your framework and writing out posts can work wonders in growing your organic traffic.
The higher up your website appears in large search engines, the more visitors your website will attract who aren’t captured through alternative channels such as social media.
But the necessity of these add-ons is also driven by your own circumstances as a blogger. Is your end goal to sell off your blog? Have you ever set up a site before? What type of audience are you looking to connect with?
Determining your site’s target market will assist to figure out whether the extra services offered by Bluehost are necessary to bundle together. If your goal is to simply get a site set up on Bluehost and WordPress, the basics should get you where you need to go.
Just like upgrading your hosting package, with Bluehost, if you want to add additional features, this can always be done at a later time with zero hassle.
Step Five: Selecting a Content Platform
There are a ton of content management systems (or CMS’s) available for the publishing of your blog. It can be overwhelming to try and select one to meet your blogging needs. From Weebly to Wix, SquareSpace to WordPress, the options are endless. However, for the sake of simplicity, SEO value, and ease of use, we highly recommend WordPress.
WordPress is the world’s most popular online publishing platform, and for good reason. Since its creation in 2005, it has evolved into a complete online CMS that powers over 30 percent of the internet. This includes the websites of an impressive list of global brands. Think UPS, CNN, eBay, LinkedIn and the New York Times, among others.
WordPress is free, open-source software that allows you to create your own blog, website or app. This is done using thousands of attractive, infinitely customizable themes. As your blog grows, you’ll have access to more than 45,000 free plug-ins for incorporating additional features. These features include forums, members-only content, online stores and more.
Why Not Others?
- Shopify is an amazing option for those looking for a stellar platform for e-commerce. However, while the excel at e-commerce and online store-related tasks, Shopify does not perform well at all for blogging.
- Weebly, Wix, SquareSpace and other “easy to use” drag-and-drop content management systems are wonderful for small businesses (dentist offices, hair salons, restaurants, etc) and those who want the easiest possible option on a static website. However, for SEO, customization, and blogging capabilities, none of them hold a candle to WordPress.
- Joomla and Drupal are similar to WordPress in how they work, but have nowhere near the customization and popularity of WordPress.
Just a Few Benefits of WordPress
- With WordPress, there is no need to learn any code. It works perfectly out of the box, and with the range of plugins, themes, and other customizations, it is a breeze to navigate.
- All websites require maintenance and updates for security reasons. Luckily, WordPress has automated update availability, so you don’t leave your site open to security vulnerabilities.
- While other companies have a direct support team, finding answers is not easy. Sometimes you have to write an email, or pore through the knowledge base. WordPress, however, has endless support options. As it’s an open-source project, tons of users are working on WordPress, its themes and its plugins.
- Squarespace doesn’t have plugins at all. Wix provides a limited selection of plugins. Joomla and Drupal offer extensions, but they aren’t considered mainstream. WordPress plugins allow you to take a seemingly basic website and turn it into anything you want.
- Unlike Wix, Weebly and Squarespace, WordPress offers full control of your site and site files, without needing to pay a penny.
Setting Up WordPress with your Domain and Host
At this point, you are almost at the roof of your new website “house” building. You should now be ready to install WordPress. These instructions are straight from the Bluehost site itself:
We provide a program which makes it very easy to install third party scripts to your hosting account. If you want your website to have a WordPress blog, you can use Marketplace to install WordPress to the root of your site or to a subdirectory.
Installing WordPress with Marketplace
- Log in to your Bluehost cPanel account.
- Find the Website section and select Install WordPress.
- Click the Install button.
- Choose the domain name to install it to. In the field next to the domain, you can enter a subfolder such as ‘blog’ or leave it blank if you want the site’s main page to be the blog.
- If necessary, you can edit the email address, username, and password for the new WordPress installation. Click “advanced options” and you can change those settings.
- Read through the license and service agreements and check the boxes.
- Select the Install Now button.
Step Six: Setting Up WordPress After Installation
Now you’re ready to get to the bones of the operation. At this point, you have your hosting account, you have your domain, and you have installed WordPress. Now it’s time to take care of the final steps before customization begins: setup.
Installing WordPress with Bluehost is a snap due to its one-click setup option. Please note that installing WordPress doesn’t mean your website is automatically live. Instead, you will see a standard “Coming Soon” or “Under Construction” page.
You will still need to perform some basic setup to your WordPress site before it can be launched through the Bluehost platform. To do so, start in your control panel, and select My Sites from the control panel to the left.
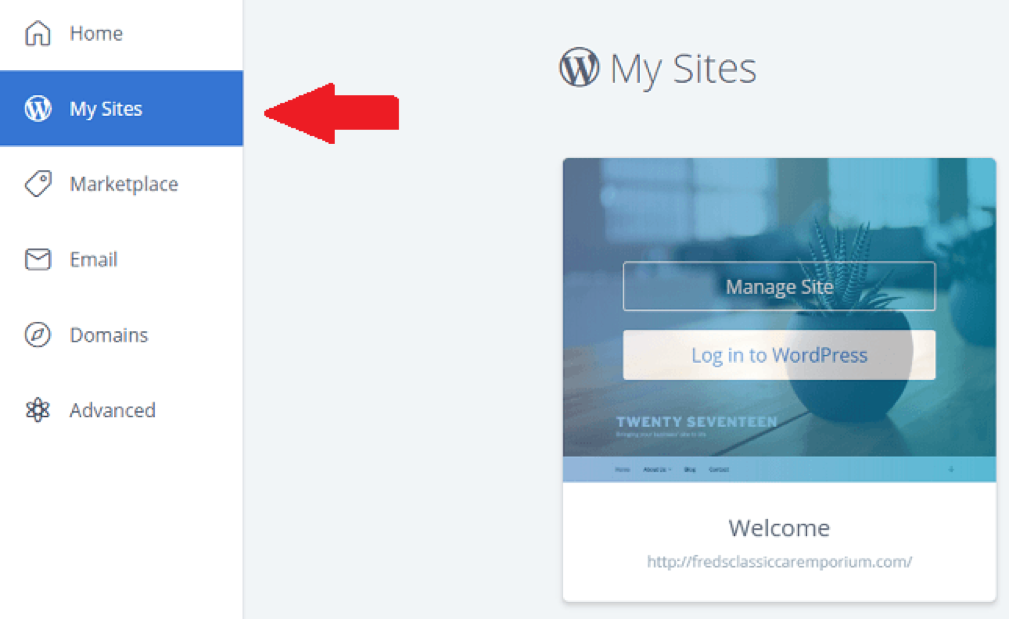
From this point, you should log into your existing WordPress installation on the domain provided to Bluehost or purchased on their platform. Alternatively, you choose “Create Site” to build a brand new site through WordPress.
If you did not select a specific theme in the Bluehost setup process, a theme will have been pre-selected for you. No need to worry, this can be changed at any time straight through WordPress.
Follow the steps in the prompts and enter all necessary information to properly launch your new WordPress website. Some of the selections at this point include whether you would like to have a Contact page built (we suggest this) and if you’d like a rolling or a static “news welcome” page.
Additionally, you will have the opportunity to integrate WooCommerce into your WordPress site. This is beneficial if you plan to sell any products on your site at any point.
If you do not have an account through WordPress.com at this stage, you are then prompted to create one. Signing up through WordPress.com is completely free, and provides you with additional functionality. This also allows you to utilize the plugin Jetpack, which is on our list of the 10 Best WordPress Plugins to Supercharge Your Blog in 2018.
Then, hit Launch and it’s time to get to personalizing!
Step Seven: Establishing Your Theme and Format
Once you have WordPress up and running, next comes the fun part. You must choose a theme for your blog’s design and format.
When you first install WordPress, your blog will reflect the platform’s basic default theme. However, you’ll want to update your theme to fit the style and tone of your content. Your first order of business will be deciding if you want to use a free theme or pay for a premium theme.
Are you starting a blog for business reasons? If so, the polished look and extra features make a premium theme the way to go. This includes supporting your company, growing your client base or working toward a product launch. Are your blog is geared more toward personal interests or experiences? If so, a free theme is probably sufficient to meet your needs. Before you decide, weigh the following factors:
- Cost – premium themes won’t break the bank, but they could set you back by $100 or more.
- Security – some free themes contain malicious coding that could compromise your information or cause technical difficulties.
- Support – premium themes are likely to come with more responsive customer support, while support for free themes is typically limited to user forums.
As you’re selecting a theme, you’ll want to make sure it meets a few important criteria.
Criteria for theme selection
First, it must be mobile-responsive. A significant portion of your audience will be accessing your content using a smartphone, tablet or other mobile device. If your formatting doesn’t transfer, chances are they’ll get frustrated and stop reading. Google also dings sites that aren’t mobile-friendly in its algorithms. Making sure your blog is responsive will help ensure the best possible ranking for your content. Most WordPress themes are mobile-responsive, but you can also check a theme against Google’s Mobile-Friendly Test.
You’ll also want to choose a theme that’s compatible with any plug-ins you might want to incorporate to add functionality to your site, which commonly includes tools for SEO, caching, security and content backups. Most popular themes will be widely compatible with plug-ins, but check with the developer if you’re unsure.
Finally, keep it simple. While you can find themes with a wide range of color, design and even animation options, remember that less is more. A clean, uncluttered design and plenty of white space will make your site easy to read and more visually appealing. This is in comparison to a page crammed with graphic elements and font changes. Ensure site navigation is well-organized and intuitive. This is so visitors can easily find what they’re looking for.
Free versus premium themes
If you plan on using a free theme, you’ll want to try to stick with the options in the WordPress directory, which have typically been vetted for malware and other issues. To update your theme, go to your WordPress dashboard. Then, mouse over “Appearance” in the sidebar and click “Themes”. Click on “Add New” and search for a theme using the theme name or the feature filter. This filter locates themes based on tags or specific design elements. Once you find the theme you want to use, click “Install” and then “Activate.”
If you’re interested in using top premium themes, popular sources include Studiopress, Nudge Themes, and Theme Weaver; WordPress also has an extensive listing of third-party theme developers on its website.
To install a premium theme, download the file onto your computer’s hard drive. Go to your WordPress dashboard, hover over “Appearance” and click “Themes.” Select “Add New” at the top of the page and click “Upload Theme.” Select “Choose File” and locate the downloaded theme file on your computer. Click “Install Now” and “Activate.”
Step Eight: Writing Compelling Articles
Now that you’ve got your blog looking great, it’s time to turn your attention to the reason you decided to start blogging in the first place. Time to start creating compelling content to share with your online audience.
A headline determines readers’ first impression of your post and is often the deciding factor in whether they keep reading. As such, crafting a strong, attention-grabbing title is critical. When developing your headline, try to make it unique, specific, urgent and useful. If possible, convey to readers the value they’ll receive from reading your article, and keep your message clear and concise. As David Ogilvy, the “father of advertising,” once said, “Never use tricky or irrelevant headlines. People read too fast to figure out what you are trying to say.”
Once you’ve drawn in your readers with an effective headline, hook them with an intriguing introduction. Your first several paragraphs should communicate to readers what they can expect from the rest of the post and make them want to keep reading.
Creating compelling introductions
A quality introduction includes three components:
- The hook, usually in the form of an interesting fact or question. For example, “Did you know that only one percent of adults in the United States have completed a full marathon?”
- The transition, which may include a brief personal example or story involving a famous person. In this case, it may involve the author describing his disastrous first attempt at running a marathon
- The thesis, a single-sentence summary of what the rest of the post will be about. In this example, the writer may describe the training plan he used to successfully complete a marathon.
Enhancing readability
Make your post easy to read by using short paragraphs and sentences, since readers may be turned off if they see long walls of text with no breaks. You can also use subheadings to break up your post and help summarize main ideas for readers. Once you’ve got a near-final draft ready, use Grammarly to check for typos and grammatical errors.
It’s also a good idea to run your post through a readability site to give you a sense of the level of education your audience would need to read through your text with minimal effort; if your content is too dense, it may be a turn-off to readers. The Yoast SEO plug-in will also analyze readability as well as optimize your text for web searches.
Finally, end your post with a call to action. Provide a suggestion for the next steps readers can take with the information you’ve shared with them. If your blog is business-oriented, you may ask them to try a product or service or schedule a consultation.
You’ll also want to include a few questions for readers to answer in the comments section. This encourages audience engagement and builds a sense of community on your blog. And always be sure to ask readers to share your post if they found it interesting or helpful. Additionally, include social media and email widgets that make it easy for them to do so.

Step Nine: Growing Your Audience
Have you established your blog and gotten a few posts under your belt? Now it’s time to think about ways to connect with new and existing readers and boost your organic traffic. The following tips can help you expand your reach and build a thriving online community around your site.
Tips to grow blog audiences
Stay in your lane
Too many bloggers try to be all things to all people. This results in posts that feel generic or insincere—both of which are major turn-offs for readers. Instead of chasing trends, focus on familiar topics that matter to you. Your passion will be contagious.
Establish a regular posting schedule and stick to it
Readers are looking for fresh, compelling content. If they click on your site for a few days and don’t see anything new, they may stop coming back. Decide how often you want to post new content. Perhaps daily, or maybe on Tuesdays, Thursdays, and Saturdays. Be consistent with that schedule. If readers know when to expect a new post, they’re more likely to show up for it.
Connect with influencers in your niche
After you determine your focus area, seek out blogs with similar content. This helps you to learn what kind of posts have the greatest impact and brainstorm ideas for future posts. Well-crafted comments (that include a link to your blog) on other bloggers’ posts can draw in fellow commenters and build relationships with your peers. You may also want to create a post that incorporates links to relevant content from similar blogs. Then, ask those bloggers to share your post on their blogs and social media sites.
Leverage social media to reach a wider audience
It’s not enough to just drop a link to your post on social media; you’ll need to think strategically about when and where to promote your content. Familiarize yourself with your audience and use social media management tools like HootSuite to schedule your social posts at times when they’re most likely to be seen—and shared—by potential readers.
Do your (keyword) research
Search engine traffic is one of the most important avenues for bringing readers to your blog. For this reason, you’ll want to make sure your posts are optimized for online searches. Even if you don’t have SEO experience, you can still improve your content. Some of the best ways include identifying and incorporating the most popular keywords being used to find your blog and others like it. The Google keyword tool is a popular option, but other SEO optimization tools are also available.
Wrapping Up
Starting your own blog is an inexpensive and rewarding way to accomplish a wide range of personal and professional goals. This includes things such as:
- Growing an existing business
- Establishing a writing career
- Connecting with people with common interests
- Making some extra money on the side through ads or sponsorships
In this article, we’ve given you all the information you need for a successful launch; now it’s time for you to take that inspiration and get blogging.
Check out more articles here on Blogger Tips to take your blogging to the next level.


