Have you launched your blog yet? Even if you’re biding your time and gathering up content, you’re likely familiar with the concept of HTML coding. Maybe you remember it from school. Maybe you’ve dabbled a bit with it while configuring your design and blog layout.

For most, their first foray into developing a blog may leave them confused and concerned. Any customizations beyond what is plug and play requires a slight knowledge of HTML for bloggers. Heck, without a WYSIWYG (what you see is what you get) common in WordPress, it would take some coding just to make a word italicized.
Back in the early days of blogging, one would need to know some HTML code to properly format their web pages. Everything from simple word formatting (bold, italics, underline) to proper SEO tactics (links and headings) required hand coding.
It’s important to have a general idea of how HTML works, to ensure your blog remains in ship shape. The knowledge of HTML coding comes with a wide array of benefits. HTML is everywhere, from copyrights in the footer to setting up Google Analytics.
This post will go in-depth into what HTML is. We will explain how it looks, its workings, and the importance of bloggers to retain a basic idea of how to use it to their advantage.
The goal is, by the time this post is finished, you should be able to write some simple HTML coding on your own. You’ll be surprised how simple it is. It’s important to note that these instructions are for blogs that are hosted on WordPress. However, regardless of the platform chosen, the code will be the same structure.
What is HTML, and what can it do for my site?
HTML is an acronym that is short for “hypertext markup language”. The markup comes from the coding language’s purpose. This purpose is to mark up plain text. This is so it may be formatted with things such as bolding, italics, line breaks, colored fonts and more.
Hypertext stands for the allusion that text can be linked to outside resources (also referred to as hyperlinks). Without HTML in use, this entire post would be a long, unformatted, single paragraph. Would anyone have any interest in reading that? Of course not. HTML brings about order, clarity, and organization to blogs.
How does HTML appear?
All posts created and written through WordPress have HTML that comes inbuilt for you through their WYSIWYG (what you see is what you get) editor options. Here is an example of how HTML plays into a sentence:
<p>For the next <em>three days</em>, this product can be purchased for only<strong>$19.99</strong></p>.
The above is what the sentence appears to be in raw HTML. Once it is put into dynamic text on a live web page, it appears as such:
For the next three days, this product can be purchased for only $19.99.
Do you see what the HTML code did to enhance the sentence?

Here is each piece of the involved code and an explanation of its purpose to provide structure and clarity to the above sentence:
- <p></p> is a paragraph code, starting and ending a paragraph, or in this case a sentence.
- <strong></strong> is the start and the end to a bolded section. The first piece starts the bold section, and the second piece ends the bold section.
- <em></em> is the start and the end to an italicized section, or emphasis. The first piece starts the italicized section, and the second piece ends the italicized section.
The <p>, <strong>, and <i> pieces are referred to as HTML tags.
Why does the structure of an HTML tag matter?
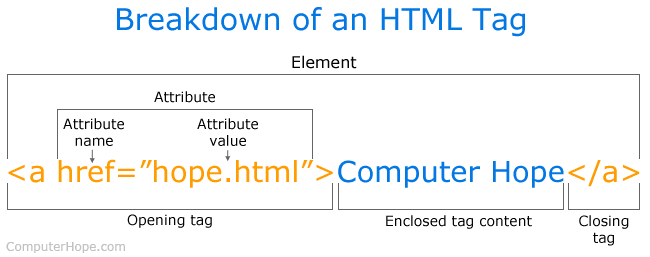
Each of the elements in HTML, whether a list, a paragraph, or word formatting, must begin with an opening tag and end with a closing tag. These are also sometimes referred to as start and end tags. Note that the closing tags always have a forward slash at the start of the tag.
This can seem a bit complicated, especially if this is your first experience seeing HTML code written out. Below are two more examples of relatively simple HTML tags taking simple sentences and turning them into more artistic, compelling content for your blog.
HTML Example 2
<p>One thing that I made <strong>sure</strong> to check before I left was that the door had been properly locked, as to not have a repeat of <em>The Robbery</em>.</p>
Live Blog Example 2
One thing that I made sure to check before I left was that the door had been properly locked, as to not have a repeat of The Robbery.
HTML Example 3
<p>What is your favorite color?</p>
<p><font color=”red”>Red</font> or</p>
<p><font color=”blue”>Blue</font>?</p>
Live Blog Example 3
What is your favorite color?
Red or
Blue?
Please note that, with the above example, the word is spelled “color” and not “colour”. As HTML was developed in the United States, the tags utilize American English. This is the same worldwide when writing and utilizing HTML code.
So how do I view this in a blog?
When writing blog posts in WordPress, you start out in the Visual mode. There is a toggle between Visual and Text. Switching to Text shows you the blog post in plain text HTML (and sometimes CSS, but that’s a completely different animal).
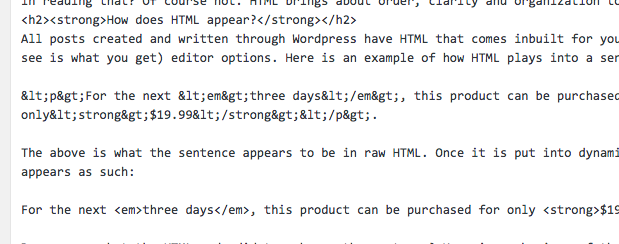
Visual is what was referred to earlier as WYSIWYG, or What you see is what you get. Here is a screenshot of what the start of this post looks like in Text mode:

This is the current post you are reading, but marked up in HTML code. To make life a bit easier for webmasters and blog owners, WordPress opted out of including paragraph <p> tags around individual paragraphs in their visual editor. However, they exist in the HTML of the actual web page.
When is HTML useful when blogging?
Typically, it is perfectly reasonable to utilize the visual editor only when creating your posts in WordPress. The blogging platform has made things far more user-friendly over time. You can likely do all necessary formatting through the visual editor as well.
Nevertheless, at times HTML can come in handy to gain comfort in editing and viewing basic HTML while blogging.
Reasons you may need HTML
There are many instances where knowledge of basic HTML can assist in your blogging pursuits. Some of these include:
- Things can go wrong with post formatting without notice. If it is something that cannot be easily fixed or rectified in the visual editor, you’ll need to dive in. You might be able to correct the issue when viewing the post’s HTML coding.
- Looking to build a customized text-based widget on your sidebar? Something like an About section or an Introduction? If so, you can link to an About page, as well as inserting a photo. While themes and plugins exist that can assist, you might not want to add these to your blog. Excessive plugins can affect page speed and in turn search rankings. Instead, utilizing HTML is an effective and faster method to get what you’re looking for with a widget.
- You might be requested to supply things such as guest posts in HTML format. When this happens, you will need to either copy and paste your HTML coding, or actually, write it out and format it.

Diving deeper into HTML tags
We have already covered some of the more simple HTML tagging such as <strong>, <font color> and <em>. But what else can be tried and considered basic HTML? Here are some additional HTML tags that are beneficial to know when blogging via WordPress or any other content management systems.
Line breaks: <br/>
This tag is somewhat unique, as it is both open and closed simultaneously. This is why the forward slash is located at the end. This <br/> tag creates one single line break, and not a break for paragraphs.
These are very useful when doing things such as writing song lyrics or poetry. For example:
All
Of
These
Words
Utilize
Line
Breaks
For
Separation
Again, the <br/> tag creates one single line break. To create this tag when in WordPress’ visual editor, hold down the Shift key while pressing enter.
Horizontal rules: <hr/>
This is like the line break tag, in that it is an opening and a closing tag in one. This creates a horizontal line that stretches the length of your page.
The horizontal rule is extremely useful to separate pieces and parts of blog posts from each other. So, if you have an offer or a call to action, or an attribution to a guest author, they can be differentiated from the blog post content itself.
To perform this action in WordPress’ visual editor, click the horizontal line button that is in the editor itself:
Lists, ordered lists, and unordered lists: <li>, <ol>, and <ul>
As a WordPress-based blogger, you are likely very familiar with the importance lists play in article structure and organization. You will certainly be looking to develop a list with numbers or bullet points. In HTML, these are ordered or unordered.
- Unordered lists are utilized with the <ul></ul> tags, and show in visual editor with bullet points.
- Ordered lists are utilized with the <ol></ol> tags, and show in the visual editor with numbers.
Lists can appear a bit more complicated in HTML coding when compared to other tags and coded elements. Not only do the lists themselves need opening tags and closing tags, but each list item will also need an opening and closing tag on their own. Here is an example:
<p>Grocery list for the week</p>
<ul><li>Brown rice</li>
<li>Mixed vegetables</li>
<li>Chicken breasts</li>
<li>New York Strip steak</li></ul>
Do you see the listed items in their own tags, wrapped in the unordered list tag? Properly formatted in the WordPress visual editor, that HTML would look as such:
Grocery list for the week
- Brown rice
- Mixed vegetables
- Chicken breasts
- New York Strip steak
Nice and clean, right? Now let’s say you want to rank something from one to five. Instead of using the <ul></ul> tags, use the <ol></ol> tags to create an ordered list. Therefore, this code:
<p>My top five favorite foods</p>
<ol><li>Ice cream</li>
<li>Chocolate chip cookies</li>
<li>Brownies</li>
<li>Cookie dough</li>
<li>Cheesecake</li></ol>
Would look like this in the WordPress visual editor:
My top five favorite foods
- Ice cream
- Chocolate chip cookies
- Brownies
- Cookie dough
- Cheesecake
Creating links: <a>
HTML tags to develop hyperlinks are a little more complicated than others looked at. This is because the tag includes the link itself. Here is an example of a link tag:
<a href=”https://bloggertips.com”>BloggerTips</a>
And here is what it looks like in WordPress context:
Href stands for “hyper text reference”. This is the place where the URL link of what is being linked to is placed. An http:// or an https:// is required in the tag to ensure the text properly becomes a link.

It is also vital to include closing link tags. That is the </a>. Not doing so will cause the entirety of your text to turn into a link.
Linking to images: <img>
Image tags are another one which opens and closes in one tag. Here is a solid example of an image tag in use:
<img src=”https://bloggertips.com/logo.jpg”/>

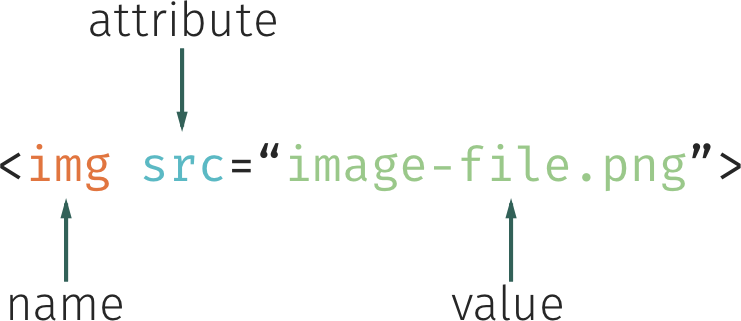
It’s easy to see that the image tag works like the link tag> “Src” in this case stands for source, and links to the image URL. To discover the link for an image on your blog, open your WordPress Media Library, go to the image, and find the URL field. This is the image link.
Give these HTML tags a go
Try some of the above HTML tags on your own articles. You can even open a draft of a new post and get some practice. Type some paragraphs, or copy something written elsewhere, and format it up. Make sure not to forget closing tags, and then switch back to visual mode to see how your formatting looks.


