
So here you are. You are now the proud owner of a sleek, modern website. The curator a captivating blog. You’ve got the domain and you’ve got the top-notch content. People are beginning to show up and they’re starting to take notice of the hard work you’ve put into your site.
Now, if you’re truly interested in growing your website and increasing the influence and credibility of your overall brand, you’ve got to be curious about the people who are viewing your site.
- How many people are visiting?
- Where do they live?
- What websites are sending the most traffic over to my site?
So many questions. Where does one find the necessary answers?
This is the job of Google Analytics. In this article, I’ll explain what Google Analytics is, why your website needs it, how to set it up, and how to use it to get the most out of your site’s potential.
Google Analytics is a web analytics tool that has been around since way back in 2005. As of today, it’s the most popular analytics tool on the market. And, this is the best part, it’s completely free!
Google Analytics is a tool that allows you to track your website’s traffic and learn vital information about your site’s visitors. It presents you with a clear picture of your site’s strengths and weaknesses, and lets you know what changes need to be made to improve traffic to your site. With its bounty of useful information and non-existent price tag, it’s a risk-free analytics tool that every website owner should take full advantage of.
Google’s free analytics tool can answer so many questions that you may have about your website.
- How many people are visiting my site right now? Per day? Per hour?
- What location are they viewing my site from?
- What marketing tactics work best on my site’s visitors?
- Which of my site’s pages are most popular?
- What content do my visitors enjoy the most?
Setting up and using Google Analytics to find the answers to these questions and more may seem a bit overwhelming at first, but by following these simple steps you’ll be increasing your website’s bottom line in no time.
Step 1: Sign Up for Google Analytics
To use Google Analytics, you’re going to need a Google account. If you’ve already got a primary account with Google that you use for Gmail, Google Calendar, YouTube, or Google Drive, you can use that. Otherwise, take a couple of easy minutes and set up a new account with Google.
Make sure it’s an account you plan to keep access to, as you want to keep control of your site’s Analytics info. You shouldn’t let someone else set up an Analytics account for your site under their own Google account. If you lose access to that account, you’ll be forced to start over with a new Analytics account, losing your site’s past analytics information.
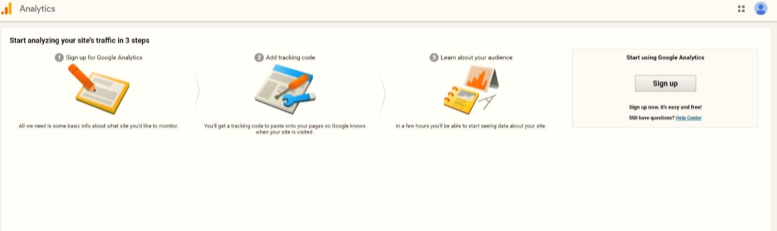
Once you’ve got a Google account, you’ll need to go to Google Analytics and click on the blue “Start for Free” button. On the next page, you’ll be greeted by Google Analytics’ three steps to analyzing your site’s traffic. Click the Sign Up button.
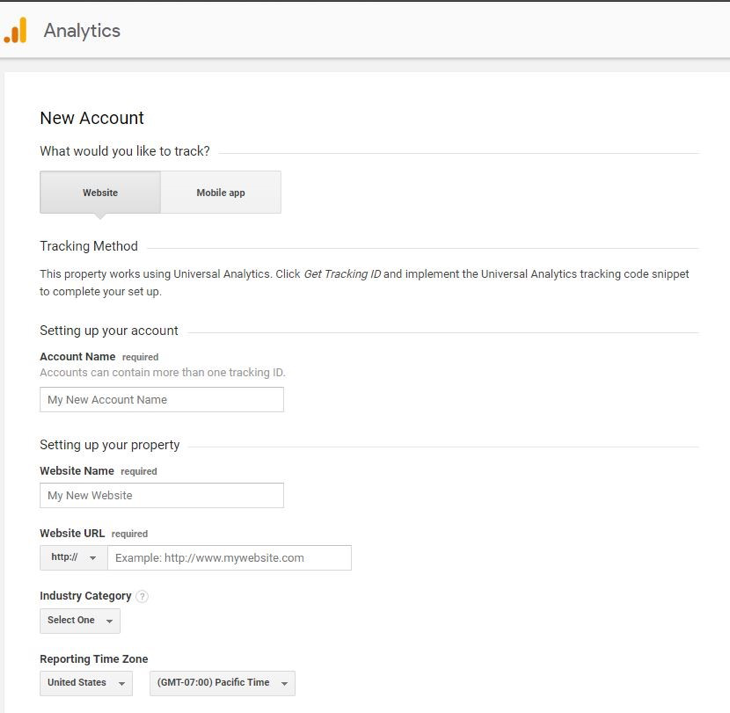
Clicking the Sign Up button will lead you to this page, where you’ll fill in the information about your site.
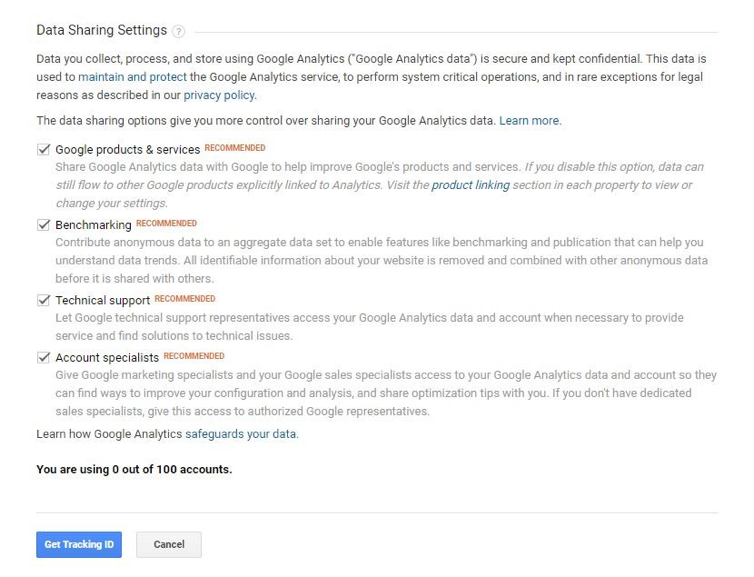
After entering the necessary information about your site, you’ll need to configure your data-sharing settings. Enabling the recommended settings by checking the box next to them will ensure that you get the most out of Google Analytics. Then, click on the “Get Tracking ID” button. The Google Analytics terms and conditions, which you’ll need to agree to, will appear in a pop-up window.
Step 2: Install Your Tracking Code
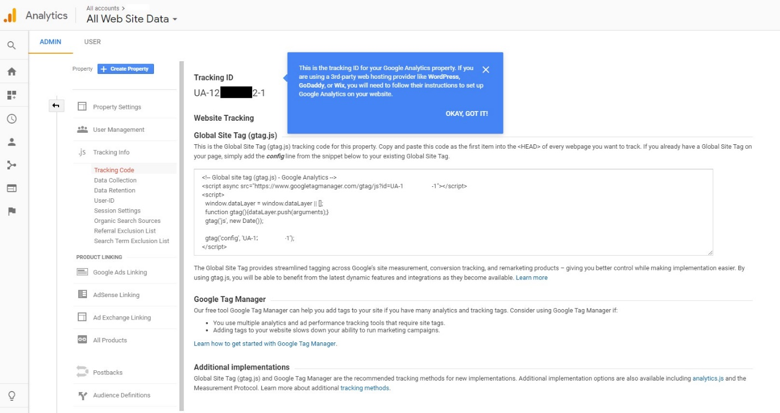
Once you’ve agreed to the terms and conditions, you’ll arrive at the next page. Make sure you’re under the ADMIN tab, located on the upper-left of the screen, and not under USER. Here you’ll find your Google Analytics tracking code. This tracking code will have to be installed on every page of the website you want to track. The way you install the code will depend on what type of website you have and what site platform you’re using.
Good analytics tools and plugins
If you have a WordPress website, you can easily download a plugin to install your code hassle-free. The two most popular are Google Analytics Dashboard for WP and MonsterInsights.
For a site built with HTML files, you’ll need to paste the tracking code before the </head> tag on each page. This is done using a text editor program like TextEdit for Mac or Windows’ Notepad. You then upload the file to your web host using an FTP program. Some popular FTP programs include FileZilla, FTP Voyager, and WinSCP.
If you have a Shopify E-Commerce store, you’ll paste your tracking code in the designated area under the “Online Store” tab.
For tracking a Tumblr blog, click on the account tab on the top right corner of your Tumblr Dashboard and find the “Edit Theme” button on the following page. On the Edit Theme page, scroll down. Under the “Theme Options” heading, you’ll find a box to paste your Google Analytics ID.
The process of installing Google Analytics varies based on the platform, theme, and plugins you use. You should be able to find simple instructions on installing Google Analytics on any website by searching, “installing Google Analytics on (your site’s platform).”
Step 3: Set Up Your Goals
After installing your tracking code, you’ll want to configure your site’s goals. By setting certain goals for your site, Google Analytics will be able to track conversions and provide crucial information that can help you determine the efficacy of your site.
For example, if you have an online store, you should create a final “thank you” or confirmation page for visitors to land upon once they’ve completed a purchase. Or if you use a contact information form to generate leads, you should create a confirmation page for your website visitors to land upon once they’ve submitted their contact information.
By configuring certain specific actions as goals, Google Analytics will take note each time one of these actions is met by your website’s visitors. You can set up to 20 goals, and each time one is met, you’ll receive a detailed report. This will show which parts of your website work and which parts don’t. This information will allow you to implement necessary changes and improve your site.
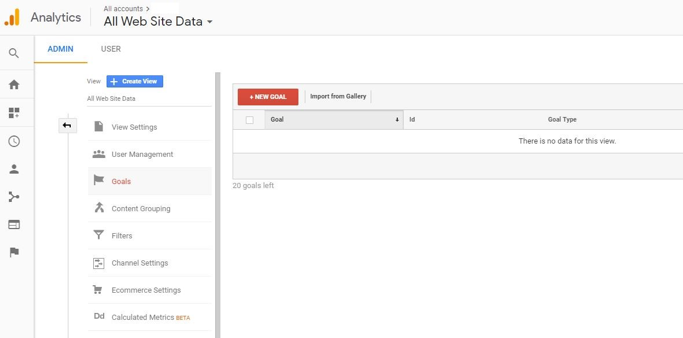
To set up a goal, follow these simple steps. Go to the Admin tab, and under the View column, click on “Goals.” Find the big red button labeled, “+New Goal.”
There are two options for creating your goals. You can choose a template or create a custom goal. Under the Template option, there are four-goal categories: Revenue, Acquisition, Inquiry, and Engagement.
These goal templates, if they align with your site’s needs, are an easy way to set up common goals. Creating a goal under each of these four categories is a good way to determine how your visitors are interacting with the content on your site.
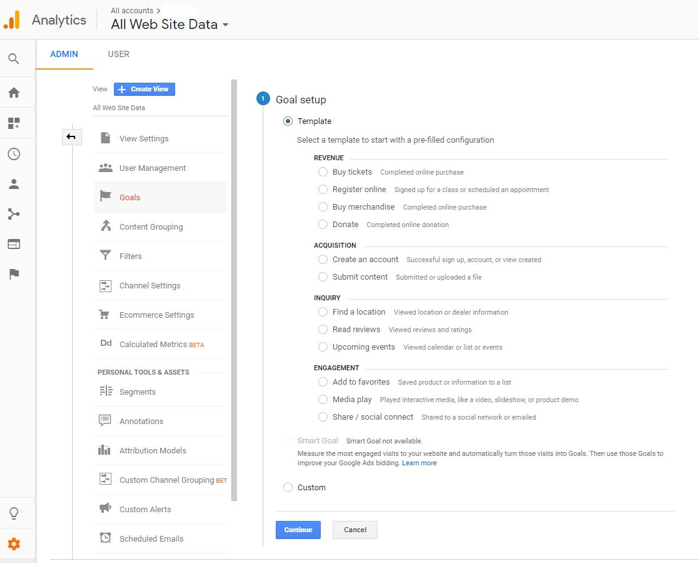
If these templates aren’t applicable to your website, you should choose the Custom option. Then click the blue Continue button.
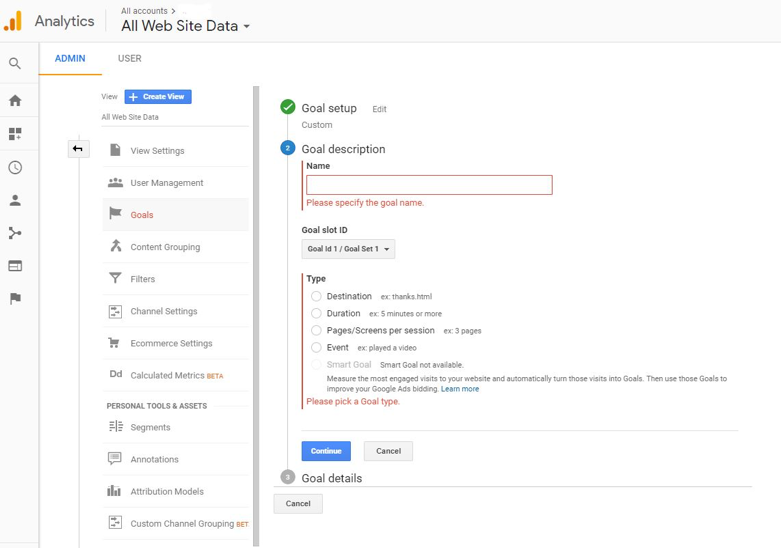
You will now need to name your goal and choose its type. There are four types available: Destination, Duration, Pages/Screens per session, and Event.
Destination
If your goal is to measure the success of your subscriptions, and you want to treat page views as conversions, choose Destination as your goal type.
Duration
Your goal type should be Duration if you want to treat the amount of time on particular pages as conversions.
Pages/Screens Per Session
If you want to use the number of your site’s pages viewed per person as a conversion, then choose Pages/Screens per session as your goal type and proceed to the next step. The word “screens” here refers to mobile app views.
Event
Event should be your goal type if you’re looking to treat visitor interaction with your website as conversions. For example, if you want viewers to watch a video just before reaching the last step towards a conversion, create an event goal that you can measure.
Step 4: Set Up Site Search
Site Search is another incredibly useful tool that is easy to set up and will offer tons of valuable data. It’s useful for any website with a search box. Setting up Site Search lets you know what visitors are looking for when they perform a search on your site.
First, go to your Google Analytics homepage and click on the Admin button. Under the “View” column, you’ll find “View Settings.” Scroll down until you see Site Settings and switch it to On.

Now you need the query parameter. The query parameter is generally an “s” or a “q”, but you’ll need to perform a search on your site to find out which. It doesn’t matter what you search for in your site’s search box, your query parameter will always be located in your URL right before your query. For example, if you search for the word “Analytics” on Google, the resulting URL will begin as so:
https://www.google.com/search?q=analytics…
Therefore, the query parameter will be “q”, as it appears just before “=analytics.” Afterward, just click on the Save button and Google Analytics will begin to track every search made on your website.
Step 5: Add Additional Accounts & Properties
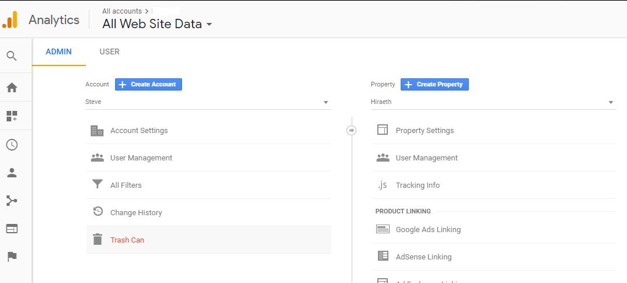
Adding additional accounts and properties to your Google Analytics profile is extremely simple. In the Admin section, in the Account column, you’ll see a blue button labeled “+Create Account.” In the Property column, you’ll see a similar blue button labeled “+Create Property.” After choosing to add an additional account or web property, simply follow the steps previously listed above to set them up.
Step 6: View Your Google Analytics Data
Once you’ve signed up, installed Google Analytics on your site, set up your goals, and set up all your sites, you’ll have to wait about 24 hours for Google to start collecting your data and allow you to view your site information.
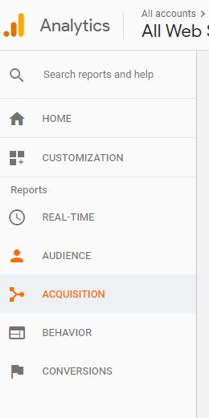
Once the data does start pouring in, you’ll be able to learn a lot about your website’s traffic. There are various kinds of reports offered by Google Analytics, located on the left sidebar of your Analytics homepage. These reports are Real-Time, Audience, Acquisition, Behavior, and Conversions.
Real-Time Reports
The Real-Time tab is where you monitor activity on your site as it happens. The data updates continuously and each page view is reported a few seconds after it occurs. Real-Time shows the number of people on your site at this very moment, as well as their geographic locations, which pages they’re viewing, the keywords and sites that referred them to your site, and all conversions as they happen.
Audience Reports
Here you will view everything you need to know about the people visiting your site. In these reports, you’ll find your visitors’ age and gender. You can also see what their interests are, where they live, and what languages they speak. You’ll also see how often they visit your site and the devices they use.
Acquisition Reports
These reports show what drives visitors to your website. You can see your site’s traffic broken down by main categories and specific sources, as well as what social networks are driving visitors to you.
Behavior Reports
Behavior reports tell you everything you need to know about the most popular pages on your website. You can also see the top entry and exit pages. If you’ve set up Site Search, you’ll be able to see what terms are searched for and the pages they are searched from. You’ll also be able to view your site speed and suggestions from Google on how to make your website faster.
Conversion Reports
If you’ve set up goals for your site within your Google Analytics profile, you can see how many conversions your website has received and what URLs they took place on. You’ll also be able to view the path that visitors took to complete the conversion.
The Final Step: Improve Your Site
That’s it! You’re all set up on Google Analytics. Try exploring the site and playing around with everything a bit. You’ll soon be an expert at navigating the boundless information that Analytics provides.
Once you’ve got a steady flow of information by your side, you’ll be able to learn what works for your website and what practices are hindering its growth. Using this information correctly to alter and improve your site is sure to boost your traffic. This will add to the success of your website. Good Luck!


[…] on your page outweighs the number of ads. You should also take advantage of data provided by Google Analytics to discover the number, size, style, and placement of ads that best resonates with your […]